|
|
|
|
|
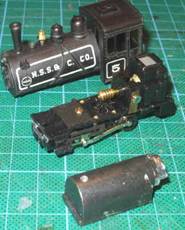
Those of us who model in Hon30 frequently bash our locomotives using N scale mechanisms and a variety of conversion kits by Chivers Finelines, Mark Rollins, Railway Recollections, and others. The combination of excellent mechanisms and high-quality conversion kits yields some first-rate locomotives, ranging from a Class A Climax built on a SW1200 chassis to a great 2-6-2 or a 2-4-4T Forney for the Maine two-foot contingent. Back in the
1960s, AHM sold a cute little Hon30 Recently, a short article by Ed Cass appeared in Jeff Law’s e-zine, Hon30 Lines, in which he told how he had adapted a modern, smooth-running Life-Like N scale 0-6-0 chassis to fit under the AHM Baldwin shell. Since the LL loco sells for about $30, I was inspired to try a similar conversion. While I was at it, I added some detail to the body shell, and fitted MicroTrains couplers in place of the loop-and-hook couplers of the AHM body. The result is a very good-looking, smooth-running loco for my backwoods logging operation. Modifying the Chassis Start by
removing the Life-Like body from the chassis.
There is just one screw, on the bottom between the cylinders.
Also remove the couplers. Then,
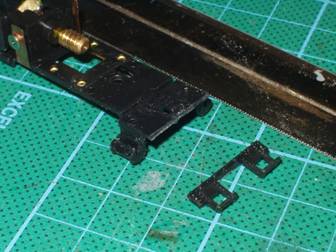
with a razor saw, cut the too-small N scale pilot from the plastic
upper portion of the Life-Like chassis as shown in Figure 1. Figure
1 Proper alignment
of the
Figure
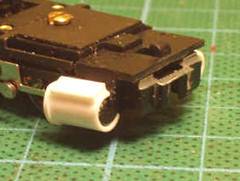
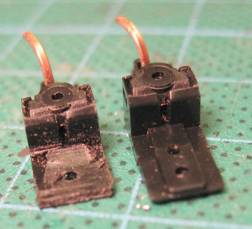
2 Filing the notch across the chassis as shown has a serendipity side effect: a small slot is revealed in the chassis that turns out to be perfect for coupler mounting. We’ll get to that in a moment. While you are at it, go ahead and file a similar notch across the back of the chassis. The N scale cylinders are way too small for HO, so use a section of 3/16” styrene tubing to build them up to a larger diameter. Cut a portion of the tubing away (lengthwise) so that it will slip over the cylinder, build up a valve box from a length of styrene channel and a rectangle of styrene for the top. I cut a disk of styrene for the front of the cylinder and wrapped/glued a 1x2 styrene strip around the back end. See Figure 3 for the first two steps and Figure 4 for the finished cylinder.
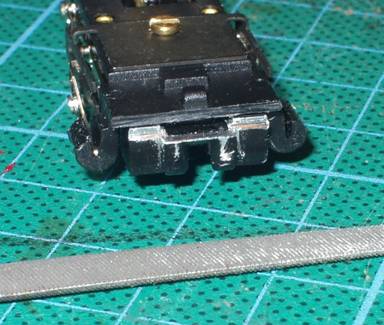
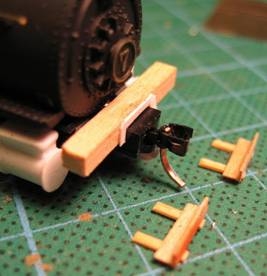
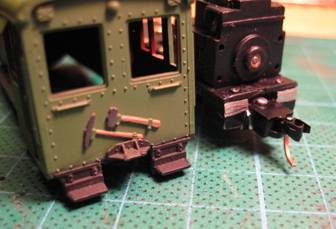
I use MicroTrains couplers on my layout instead of the loop-and-hooks original to the body shell. My solution is not the cheapest, but it certainly is effective in this situation. As I mentioned earlier, filing the notch across the front of the chassis revealed a hidden slot above the original coupler box. I used the couplers from a pair of MicroTrains 1017 Passenger Trucks with adjustable couplers. These particular couplers have a very shallow (front to back) draft gear box and a convenient mounting tab that just fits into the slot in the chassis. It is necessary to shorten the tab with a razor saw and remove the ridge on the underside of the tab with a jeweler’s file so that it fits the slot. Figure 4 shows before and after the coupler mods and Figure 5 shows the front coupler in place, mounted with a 00-90 screw tapped into the chassis. Similar filing and tab modifications can be used for the rear coupler.
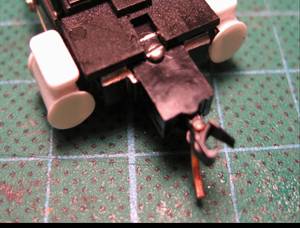
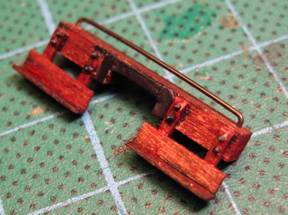
Figure 4 Figure 5 The front pilot can be supported on the newly-installed coupler. I made mine from a length of HO scale 10 x 10, notched to fit tightly over the coupler box, plus some scrap pieces for the footboards. You could use styrene or brass. Figure 6 shows the pilot in progress and Figure 7, ready to install.
Figure
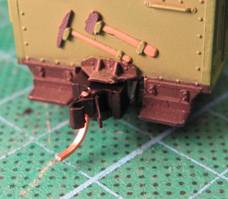
6 The nut/bolt/washers are by Grandt Line and the handrail is 0.025" brass wire blackened with Blacken-It. Finally, I found
that the weight from an old Bachman 0-4-0 Docksider fit inside the
Figure 8 Body Modification The only absolutely necessary modification to the body shell is to provide clearance for the rear coupler. It so happens that the slots in the Life-Like chassis position the couplers at exactly the right height, but the rear footboards and loop-and-hook coupler of the body shell extend considerably further down. With a razor saw, cut two vertical slots, spaced the width of the coupler draft gear box apart, in the bottom rear of the shell. Then trim across at the height of the top of the coupler. I salvaged the coupler support casting from the cut-out portion of the body and glued it at the top of the new slot. Figure 9 shows the rear coupler mounting and the body modification. Figure 10 shows the assembled body/coupler.
Figure 9 Figure 10
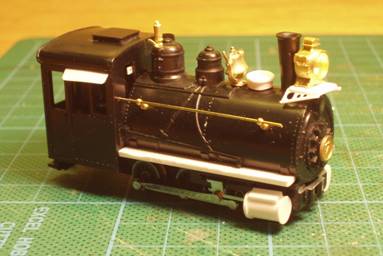
Body Details I added several
details to my body shell, including a better whistle and bell, a new
headlight and a scrachbuilt headlight bracket, a big number plate on the
smokebox door, running boards along the saddle tank, a water fill hatch to
conceal the mounting screw, sunshades over the cab windows, an operating
lever for the sand dome, and handrails along the saddle tank.
Most of these were suggested during a visit I made to The
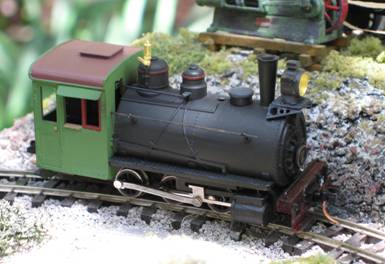
Hawaiian Railway, on Oahu, where two 1890 vintage Most of the details are easy to spot in Figure 11, although some are just sitting in place, not attached, prior to painting. I later decided not to use this particular bell because the AHM shell has the air line for an air-ringer bell molded on. Instead, I used a Cal-Scale 317 air-ringer bell, but it had not yet arrived when I took the picture for Figure 12, which shows the nearly-finished project, after airbrushing the saddle tank with Polly Scale “Steam Power Black” and the cab with my favorite Polly Scale “Light Green.” The cab roof is “Boxcar Red.” Weather to suit yourself.
Figure
11
Figure
12 Parts List Body shell –
AHM Baldwin Misc
|
|
This page last modified 02/20/2007
|